Showing posts with label Foil. Show all posts

Sunday, November 8, 2015

Catching up with some crafting....


Hi Everyone,

It has been a busy few weeks for me, getting my house ready for a holiday party next week.  Sometimes it's good to have a reason to stop crafting and do some much needed home care, but this girl needs to find a least a little time to craft!

After missing out on Tim Holtz's October tag, I made sure to get the November tag in before I start my hard core Christmas crafting.

Here is Tim's tag:
 
 
I love that pumpkin, and the cork text element is totally cool!  What I love best though, is how keeping the embellishments simple allows the amazing background to shine.
 
Here is my version of the tag:
 

As I usually do, I followed Tim's instructions for the background closely.  Isn't the foil applied with t glue stick a genius technique?   I chose a brighter palette, as I wanted this piece to stand out from the brown tones in my display boxes.  I don't have the pumpkin blueprint stamp, (although after seeing Tim's neat technique this month, I surely do want it!) so I used this lovely little girl from my collection of vintage advertising cards instead.  I made a copy, matted it, and popped it up over my background stamp with foam tape.

 
I attempted to cut a cork sheet that I purchased years ago at a dollar store with my Silver Bullet digital die cutter.  It didn't work out so well, not that it wouldn't cut, but because the cork was so old and dried out, it crumbled as I removed it from the mat.  That's ok, chipboard made an ok substitute, especially when I inked it with Distress inks to match the background of my image, and edged it with Distress paint.
 
 
Here is one last shot of my November Tag of 2015.  As always, I am displaying it in my wall of boxes.  I like the nice touch of autumn color that it adds. 
 
Thanks for stopping by! 
 
Elizabeth

Friday, October 16, 2015

Funkie Junkie 12 Tags of 2015 Week 2


Hi Everyone!

Today, I am sharing my projects for week two of the Funkie Junkie 12 Tags of 2015 Challenge.  (click the link to get all the details).

First, I'll show you Linda's lovely week 2 inspiration tag:

Isn't it beautiful?  There is so much to love here!

I was immediately drawn to the gorgeous gilded text and the trees (Christmas trees are my favorite Christmas symbol!)

Here is how I chose to interpret this week's challenge:


I used my Foil Master to do the lettering, as I don't have the Remnant Rubs.  I added lots of other gold elements with other products in my stash, including Gold Alcohol ink on the Idea-ology Mirrored Stars, splattered a shimmery spray on the background, and used Perfect Pearls medium with a stamp and Perfect Gold Perfect Pearls to add a touch of shine to the trees.  I colored the trees with a variety of green Distress Inks. 

I decided to alter the largest of the spaces in the printer's trays this week, and these pieces make ideal "titles". 


Please stop by the The Funkie Junkie Boutique for all of your crafty needs.  You will find a terrific selection of Tim Holtz, Wendy Vecchi and Graphics 45 products, to name just a few, not to mention a beautiful range of unique embellishments to make your shabby chic/vintage dreams come true!

Thanks for stopping by today to see my week two makes!   Stay tuned for week three, in which I discover a way to tame my old nemesis, glitter!

See you soon!

Elizabeth

Thursday, November 6, 2014

The Twelve Tags of Christmas - Funkie Junkie style - Week Three


Hi Everyone,

I'm back again, with my third project in The Funkie Junkie 12 tags of Christmas challenge.  Follow the link to the instructions for playing along.  While you're visiting Linda's blog, be sure to check out what all of the other participants have been creating.  There is an amazing array of beautiful Christmas goodness!  I've been having as much fun seeing what everyone else is creating as I am making my own pieces.  (I'm too intimidated  to look before I do my tags, so I save them as a special treat after I have posted mine.)

Here is Linda's week 3 inspiration tag.  You can read all about it here:


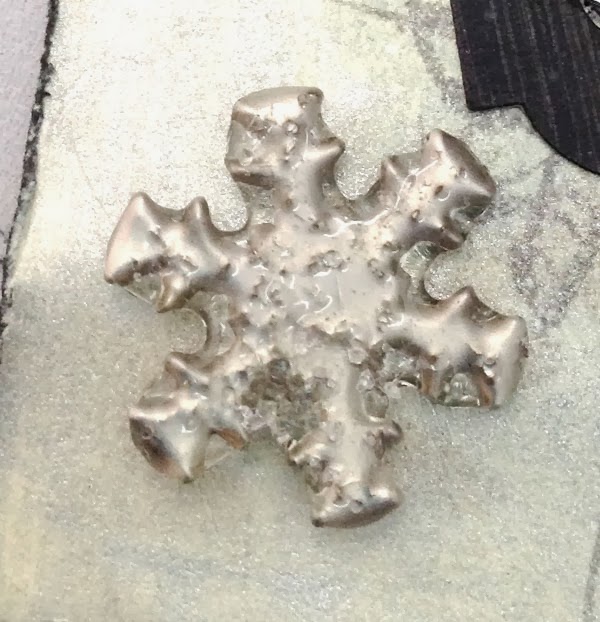
The large metallic snowflake is what immediately caught my eye.  What can I say, I'm a sucker for snowflakes every time!  They are one of my very favorite winter symbols.  As I said yesterday, this time, I went in a very different direction for my piece.


I wanted to fill one of the smaller square spaces in my printer's tray, so I needed to narrow my focus.  I created my metallic snowflake by cutting four cardstock snowflakes, (with my trusty Silver Bullet Pro digital die cutter, of course) and stacked and glued them.  Any old scrap of cardstock will work, because it all gets covered with foil tape.  I used duct tape from the hardware store (via DH), but really, the foil sheets made specifically for crafting are much shinier than mine. 

The Funkie Junkie Boutique, the sponsor of this challenge, carries Ranger Foil Tape sheets,  as well as the Vintaj Metal Sheets that Linda used in her lovely inspiration piece. 

I adhered my snowflake stack to a piece of cardstock (again, color doesn't matter) that I had cut to size.  I placed my foil tape on top, and started by using my fingers to burnish the foil to bring out the details of the snowflake.  Next I moved on to a knitting needle for the detail work.  If you don't have a knitting needle handy you could use a bone folder.   After much burnishing to bring out the snowflake details, I used the very tip of my knitting needle to add some lines outwardly radiating lines.

Next, I covered the entire piece with Black Soot Distress Paint, dried it slightly with my heat gun, and rubbed some off with a paper towel.  I used my sanding block across the top of the piece to highlight the snowflake.  As a final touch, I adhered flat backed pearls. 

I really enjoyed going off the rails a bit with this project.  I love grungy metallic elements, and this little piece fills that bill.  I do want to go back and use Linda's gorgeous background technique to fill another space in my tray.  Luckily for me, there are 20 spaces to fill!


Here's my tray with the first three projects installed. 

Thanks for visiting!

Elizabeth

Friday, July 25, 2014

A couple of Non Card projects!


Hello!

Believe it or not, every once in a while I find time to make a "non-card" project.  Here are a couple of fairly recent ones:

This is a DVD jewel box insert.  All of the red elements are foiled with my Foil Master from That's Scrap, Inc.  Sherri sells both the foil machine and the most wonderful foils I have ever used.  I wish I could do them justice in my photos.  They truly are a pleasure to work with, and add the most elegant touch to my projects.

Here's a project that took a few days to create:

It is a beverage station that I made for a friend who is heading off to college in the fall.  I constructed it all from chipboard that I recycled from cereal boxes.  The decorative papers are digital papers from Sassy Designs that I printed with my laser printer and cut to size.  I cut the chipboard pieces with my rotary cutter and ruler, as I find it a bit easier for simple shapes than using my electronic cutter.  I cut all of the decorative papers with my Silver Bullet Professional cutter, though, using the print and cut feature of my Sure Cuts A Lot (SCAL) software.  I love saving toner by printing just the shapes I need and being able to accurately cut them out; instead of printing whole sheets and having a lot of leftover scraps. 

Here is a different view, showing all of the goodies that I was able to pack into this caddy.  It is roughly 12 inches by 8 inches by 6 inches high. As suggested by my college aged daughter, whose love of hot drinks in her dorm room inspired this project, I opted not to add too many embellishments, so that it will pack easily.  The pull tabs on the drawers are reinforced washi tape, and fold flat for packing. 

I have two more of these caddies to make before September, and when my youngest DD graduates from high school next spring, I would like to make one for each of her close friends.  Probably I should start feeding my husband cereal for supper, to make sure I have enough boxes saved up by then!  No doubt he will be thrilled with that idea, NOT!

Have a happy day!

Elizabeth


Saturday, May 10, 2014

It's Prom Day!


Good Morning, Everyone!

Today is Prom Day for my younger daughter.  We have been having fun for several weeks, with gown and shoe shopping, fittings, and of course, crafting a special project. 

Leila's dress is all edgy elegance, so we didn't even try to find a corsage to match it.  Instead, I put my Silver Bullet Professional die cutter, and my Foil Master to good use, and made a custom corsage for my beautiful girl. 


I echoed the black and neon green color scheme of the gown, and chose silver to accent the wonderful mirrored beads and sequins on the bodice.  To make the glossy black and silver papers for the roses, I printed big black rectangles on both sides of plain white copy paper.  Using my favorite Penny Duncan Creations rose files, I cut the layers for each rose from the laser printed paper.  Then I ran the roses through my Foil Master with glossy black and silver foils from That's Scrap, Inc. 

By following Penny's video's, I was able to easily construct all of the roses I needed. I chose to use a combination of PDC Grungy Roses and PDC Rose Design in two sizes for variety. as well as one small bud with a black bead center.

Here are a couple of close ups:

(There is no blue in these roses.  The super shiny foil is reflecting the color from my craft room walls.)  I had to visit a few craft stores before finding just the right lime green ribbons and beads to use as embellishments.

I love adding "stick pin" embellishments to all of my flower projects.  These mirrored faceted beads match Leila's gown perfectly!  I used a Spectrum Noir marker to color the pearl head of the corsage pins.  I wanted each detail of this special project to be just right!  (Leila's big sis used the leftover beads to make a lovely multi strand bracelet for Leila to wear tonight when she removes the corsage.)

The background leaves are cut from lime green cardstock, again with Penny's files.  I added some Distress Ink to tone down the color just a notch, and some embossed veins to add a touch of realism. 

Thanks for stopping by to take a peek at my special project today.  I wish you all a wonderful weekend!

Elizabeth

Wednesday, April 23, 2014

Catching up on the 12 tags of 2014


Hi Everyone!

Happy Hump Day!  I took some time last weekend to catch up on Tim Holtz's 12 Tags of 2014.  After making the January tag, I let a couple of months slide by without a  tag made. 

I will start off by sharing my version of  this month's tag:

 See Tim's tag tutorial   for his fabulous tag and instructions.  I followed along as closely as possible using what I had on hand.  (Thanks to Mr. Holtz's excellent salesmanship, I have plenty of supplies to play with!)  There were lots of Distress products on my craft mat! 
 

As an alternative to the pinecone rose, I used Ms. Penny Duncan's SVG file, and my Silver Bullet Professional cutter to make my little roses.  I have some philosophy tags, but simply couldn't resist adding the butterfly to the trellis as my metallic element.  I enjoyed every minute while creating this tag! 

I think I'll continue in reverse order, and share the March tag next:

 
I love the idea of using second generation stamping to create a second tag.  It really speaks to my frugal nature.  I was late with these tags because I hemmed and hawed all throughout April about purchasing these stamps.  I am trying really, really, hard not to spend money on new craft supplies this year.  As you can see, I caved in to myself, and purchased the Nature Walk stamp set.  I like to work on smaller tags, so this set is perfectly sized for me.  As a bonus, it includes an absolutely adorable silverware stamp that I can't wait to use!  I'm almost certain that this is my favorite stamp set to date.  I am totally in love with it!

I don't have the Distress Marker Spritzer tool, so I substituted a stencil and Distress Re-Inker spray for that step.  I had a package of mini numerals calling out to be used, so they got colored with a bit of Distress paint and popped on.  I added Distress Painted bird house and washer charms to the seam binding tassels.

I really like these soft and simple tags.  They have a definite spring feel.

And finally, the February tag:

I had nearly forgotten that Distress Inks could be used to emboss, and was happy to have a reminder.  This is a really fun background technique.  

I don't have the supplies to do Tim's chalkboard technique, and improvised with white embossing powder.  I rubbed on some white chalk to "real it up" a bit.  I added glitter and Distress ink to some
grunge letters, with Glossy Accents as my adhesive.  I am really starting to love this stuff.  It will be time soon to restock with a bigger bottle.  The bottom border and ring reinforcer are embossed foil tape with Distress paint, and the metal embellishment is a random piece from my stash. 

There!  I am happily caught up with my 12 Tags of 2014, and looking forwarded to seeing what Tim has in store for May.

Thanks for stopping by my blog today!

Elizabeth

Tuesday, February 25, 2014

Thinking of you butterfly


Hello Everyone,

I hope you are having a marvelous day!  My card for the day is a Thinking of You card, with a beautiful butterfly designed by Retta, of Royal Inspirations. 

 
 I printed the butterfly image and foiled it with my Foil Master, and cut it out using the print and cut feature of my SCAL cutting software and my SIlver Bullet Pro digital die cutter. 
 
I added a designer paper background, and digitally cut borders to the blue card base, adhered a layered print and cut sentiment, and popped the focal image with foam dots for some dimension. 


I think the butterfly deserves the extra attention it gets by being popped off the card.  I wish I knew how to get great images of the foiling.  This blue color is so very pretty!  I just love the quality of the foils available from Sherri Jensen at That's Scrap Inc. 
 
I chose to leave the inside blank, so that I can add a personalized message when I am ready to mail this card.
 
Wishing you all plenty of creative time!
 
Elizabeth

Monday, January 27, 2014

For a special friend


Happy Monday, Everyone!


Today's card features a beautiful butterfly designed by my friend Retta, of Royal Inspirations SVGs.  I foiled the design using my Foil Master foiling machine and purple foil from Sherri at That's Scrap, Inc.  The card base and most of the elements were cut with my Black Cat Cougar digital die cutter, which I also purchased from Sherri. 

For the inside, I added a simple stamped sentiment, and some embossed and inked borders.  
 
 
Here is an alternative view of the front.  I wish I could learn to photograph the foiling to show its true beauty.  It really is an amazing product.  I stamped the little sentiment on a strip of vintage book paper with Archival Ink. 

I hope you are having a beautiful start to a wonderful week!

Elizabeth

Supplies and Tools used for this project include:
Archival Ink
Distress Ink
Recollections Paper
Vintage Dictionary and book papers
Sizzix Big Kick
Scotch ATG tape runner
Foam adhesive dots
Digital Die Cutter
Foil Master and Foil

Friday, January 24, 2014

Christmas Corner and a Tim tag


Hi Everyone!

Today I have another Christmas card to share:


I tried out a new stamping technique for this card.  I dabbed Distress Stains in various colors directly on my stamp and then stamped onto my paper.  Easy Peasy!  I love the result.  I simply added a text stamp with Archival Ink in coffee, and some Distress ink on the distressed edges.  I finished this card off by adding some Ideology rick- rack trim and mounting it on a card. 
 
 
Here is the inside:


Just some simple layering and a sentiment. 

And now for my version of the Tim Holtz January Tag:

 
  I followed Tim's tutorial, using supplies that I have on hand. 
 
Here is my background:


I used Brushed Pewter Distress Stain as a base, and stenciled a layer of snowflakes with Pumice Stone Distress ink.  I thought my tag needed another layer, so I stamped the blueprint snowflake with Watering Can Archival.  That made me happy.  I stamped my numbers with black Archival.  I sanded them a bit, as I did the "time" text, which is a Remnant Rub. 

For my main focal piece, I used foil and Black Soot Distress Paint.  This photo is from my "attic treasures" collection.  I think these fellows are perfect for a January tag.  They certainly look ready for the Polar Vortex!   I cut a piece of mica to highlight the photo, and attached it to the foil piece with brads. 

I added a type charm and a Philosophy tag to my grosgrain and floss trim.  I used Distress paint to highlight the text on the tag. 

As final detail I added this snowflake brad.  I wanted some extra texture, so I heated it up with my heat gun and dipped it into a pile of UTEE until it was covered to my liking.  When the final layer of UTEE had cooled a bit, I dipped one more time, hoping to attach some un-melted crystals.  I kind of like the results.  It looks like a snowflake embedded in ice. 

I really had a blast making this tag!  Can't wait to see what's up for February. 

Thanks for stopping by to check out my projects today!

Elizabeth

Supplies and Tools used for these projects include:

Distress Stain
Distress Ink
Distress Paint
Archival Ink
Tim Holtz Stamps Blue Print Snowflake and Little Labels
Remnant Rubs
Sizzix Alterations by TH Sunburst Embossing folder
Sizzix Big Kick
Digital Die Cutter
UTEE
Tonic Paper Distresser
Tiny Attacher

Stampendous Christmas Truck stamp


Sunday, January 19, 2014

Docmented Life Project Week Three


Hi Everyone!

Hope you all are enjoying a good week.  I am here with this week's installment of my Documented Life Project.  I am quite happy with it, for a change. 


The challenge this week was to incorporate an envelope from our mail.  I chose an envelope from my mom.  I love having a sample of  her handwriting in my journal.  I added lots of layers on top, making each layer into a separate page so that I can add extra journaling or photos later.  I used plenty of my washi tape stash for this page, and all of the elements came from my scrap boxes. 
 

After assembling everything, I embossed it all with a chicken wire folder.  Simple, fun, and thrifty.  That's what I want from this year long project. 
 
I wish you all well this week.
 
Elizabeth

Sunday, November 3, 2013

The one with more "insider" cards....


Hi Everyone!

Hope you all had a terrific weekend.  I am sharing the last of the cards I completed while taking the Insider card class from Online Card Classes.  I still have a lot of lessons to complete, but I think they will have to wait until after the Holidays. 


This card front features stamping and a raised sentiment highlighted with foil. 


I echoed the stamping on the inside, and again foiled the sentiment, using my Foil Master and foils from Sherri at That's Scrap Inc. 
 
 
This next card was really fun to make:
 
 
An embossed panel, some twine and a tag on the outside, and...
 
 
three pop up birthday gifts on the inside.  The print papers are from Sassy Designs.
 
I wish you all a wonderful week!
 
Elizabeth


Saturday, October 26, 2013

The one with the Steampumpkin and a card....


Happy Saturday, Everyone!

Here is a pumpkin that I made earlier this fall:


It started as a dollar store pumpkin.  I ran pieces of 4 inch foil tape through my Sizzix Big Kick, with various embossing folders, and then cut each piece into smaller pieces.  I removed the backing paper and applied the foil pieces to the pumpkin. After the entire pumpkin was covered, I dabbed on alcohol inks.  To finish it, I simply added the clock key and gear to the hole left by the original stem. 

This was a surprisingly easy project. I don't know where to purchase the foil tape, as my DH gave me a roll from his stash of "man stuff".  I'm pretty sure you could use regular aluminium foil and adhere it with Yes paste or another adhesive.

And for my final Halloween project of the year, here is a card I made using a file from the SVG Cuts Elmhurst Hollow kit.  Nobody does Halloween SVGs like SVG Cuts! 

I think this is the cutest!  I love a full moon, and I jazzed up this one with a Tim Holtz text stamp.  The bat in the foreground is attached with a pop dot. 

I love the dimension on this card.  It folds flat to fit in a standard envelope, too. (Secret... I made this one for myself!  Not gonna mail it!)

  I love how all the different layers work together, and how unexpected a cheery flower is on a Halloween card.  I added Distress Paint to a large brad for the center, and Distress inks to some of the different layers.

Thanks for stopping by to take a look! Hope you all have a terrific weekend!

Elizabeth

Friday, June 28, 2013

The one with my favorite card ever (so far).....


Happy Happy Friday, Everyone!

Today, I had planned to spend the entire day in my craft room, but a nap got in the way!  I should not be forgetting to finish my morning tea.  Before the sleepies set in, I made a card that I absolutely love.  I scrap lifted it from a card magazine that I have had laying around for at least a year.  I am going to a co-workers wedding tomorrow, and wanted to make a special card for him and his bride. 

Here is what I did:

Front


Inside

I used my Foil Master and gold foil for the sentiment and buckle on the front, and inside sentiment.  I did a print a cut with my  Black Cat Cougar for the layers and the buckle.  I like to foil before cutting, as it makes it easier to make a "sandwich" for my foiler.  I embossed the bottom of the rectangle with my Sizzix Big Kick, and ran some navy ribbon through the buckle.  With sheer ribbons, I like to just tape the ribbon ends on the back of the card, so the adhesive doesn't show through. 

The buckle is a file from Penny Duncan Creations.  I swear, I can't go a week without using one of Penny's files!

So that is it, a clean and simple foiled wedding card.  I'm in love with it!  I will be a little sad to put it in its envelope and give it away.  (But I'll do it!)

I wish everyone a beautiful weekend, filled with happy things!

Elizabeth

Saturday, June 22, 2013

The one where I used Bird's file....


Good Saturday, Friends!

Hope your weekend is going nicely.  The weather here in my part of New England has been fabulous for the last few days, and it looks like it will continue.  Yay!

Today, I am sharing a birthday card that I made last week.  I used a deep edged card file that was shared earlier this year by Bird, of Bird's Cards.  I enjoy keeping up with her blog, and the files she shares are both fun, and very usable. 


Since this card is meant for a 13 year old girl, I made it in colors that one of my own teenagers loves.  I made good use of my Foil Master, and foils from That's Scrap, Inc.  I am having so much fun lately trying out all of the yummy foil colors.  I featured the Silver Spectre foil on this card.  I think it goes great with the bold colors.  I used a silver Sharpie to edge the shadow layer under the script.  I could have foiled it instead, but I wanted to try out the Sharpie.  It worked really well, giving good coverage, and a very metallic look. 
 
As a side note for those of you with digital cutters, if your cuts are suddenly crappy, and your teenager has been using your machine, it is  probably time to change the blade!  I put my last good blade in for this project, and need to order some more from Sherri.  I will use Cricut blades in a pinch, but the quality of the blades from That's Scrap is far, far above the cheaper blades.  For me it is totally worth the extra expense.  This is my first blade change since January, and as I said, my teenager had been using my cutter a lot for end of the school year projects. 
 
Hope you all have a wonderful weekend!
 
Elizabeth


Sunday, June 16, 2013

The one with the Pintspiration.....


Happy Sunday, Everyone!

Hope everyone is having a good day.  I have a couple of Fathers Day cards to post today. Both were inspired by cards I had pinned recently. 

Here is the card I made for my Dads (two of them):


This was a fun card to make, with a pop up gift card slot.  Click here for a link to a turtorial for this card. 
 
 
Today,  I made hubby's card:


I used my Foil Master to bump up the shine on this simple card.  I painted the brads with Distress Paints to match the pretty gold foil, from Sherri at That's Scrap, Inc.  She has the most awesome colors. 
 
The car and wood grain stamps are from Tim Holtz.  The text stamp is from Stampendous.  It just may become my favorite background stamp.  The patterned papers are all from DCWV. 
 
Have a relaxing Sunday evening! 
 
 
Elizabeth