Showing posts with label Christmas. Show all posts

Monday, October 19, 2015

Rolling out some Christmas cards...


Hi Everyone!

Just a quick post to share a few of my recent Christmas card makes:

 I cut the branch and landscape mask stencils using my Silver Bullet Cutter, and added color with sponged Distress Inks. 
 
 
A fun way to use up scraps.
 
Another fun scrappy card. 

 
This one couldn't be simpler, but I love it.  I had one remaining Tim Holtz card blank left from a kit I purchased a couple of years ago. Some stitched (yes, I can stich!) scrap paper trees, and I was done!

My favorite thus far!  A Tim Holtz evergreen stamped in Fern Green and Olive Archival inks on a Tim Holtz kraft tag.  What makes it special is the snow, added with a white gel pen. 

 A series of cards using some Blueprint Minis, "Water Colored" with a water brush and Distress Inks. 


Between paper stacks that I won a few years ago, and paper stacks that I purchased on sales too good to walk away from, I have at least one lifetime supply of Christmas paper to use up!  This year I am doing lots of layering, inside and out, and I still haven't made a dent in it.  It think it's time for a card making party with my girlfriends!

Thanks for stopping by!  Have a terrific week!

Elizabeth

Friday, October 16, 2015

Funkie Junkie 12 Tags of 2015 Week 2


Hi Everyone!

Today, I am sharing my projects for week two of the Funkie Junkie 12 Tags of 2015 Challenge.  (click the link to get all the details).

First, I'll show you Linda's lovely week 2 inspiration tag:

Isn't it beautiful?  There is so much to love here!

I was immediately drawn to the gorgeous gilded text and the trees (Christmas trees are my favorite Christmas symbol!)

Here is how I chose to interpret this week's challenge:


I used my Foil Master to do the lettering, as I don't have the Remnant Rubs.  I added lots of other gold elements with other products in my stash, including Gold Alcohol ink on the Idea-ology Mirrored Stars, splattered a shimmery spray on the background, and used Perfect Pearls medium with a stamp and Perfect Gold Perfect Pearls to add a touch of shine to the trees.  I colored the trees with a variety of green Distress Inks. 

I decided to alter the largest of the spaces in the printer's trays this week, and these pieces make ideal "titles". 


Please stop by the The Funkie Junkie Boutique for all of your crafty needs.  You will find a terrific selection of Tim Holtz, Wendy Vecchi and Graphics 45 products, to name just a few, not to mention a beautiful range of unique embellishments to make your shabby chic/vintage dreams come true!

Thanks for stopping by today to see my week two makes!   Stay tuned for week three, in which I discover a way to tame my old nemesis, glitter!

See you soon!

Elizabeth

Sunday, March 8, 2015

Hiding In My Craftroom # 189 Any Holiday


Hello Friends!

Hope you have had a wonderful weekend!  I had some fun both crafting and otherwise, and even found time to do some cleaning!  This year, I have been having fun with some new to me challenge blogs.  One challenge that I have been wanting to join in on is the cleverly named Hiding In My Craftroom weekly challenge.  This week, the challenge was "Any Holiday".  I have been pretty good a keeping up with my Christmas cards, averaging one per week, but a nudge to get going this week was just what I needed.

 I used stamps from my fun set from last year, Glitz Design's Hello December.  This tree on the car stamp has got to be one of my all time favorites.  I stamped it with Archival Fern Green onto a scrap of cardstock from my stash, and layered it up with more scraps, and some velvet rickrack. 

Here's the inside, with more scrap layers, and more stamping with fern green Archival ink and another stamp from the Hello December set. 

I like to keep my Christmas cards pretty flat, as I mail them all, and find it easier to fit them into envelopes if they aren't too dimensional.    I save the bulky embellishments for cards that I don't have to mail. 

Did you enjoy the extra hour of daylight this evening?  I know I did, even if it means adjusting to a later sunrise in the morning.  Thanks for stopping by today.

Elizabeth

Monday, December 29, 2014

The 12 Trees of Christmas 2014: the finale....


Hello Friends!

Thanks for stopping by!  I am finally able to post my final three trees.  I probably don't need to say that making and posting my 12 trees for this year did not go this way in my head!  I'm not sure why I am still surprised when that happens.  I should rather be surprised when things do go the way they do in my head!

Anyway, I am happy with these trees, even if they did come about a bit later than planned:

Tree number ten:


This tree is much more elegant than most of my projects.  I cut six of the Swirly Tree free file by Bird of Bird's Cards.  My Silver Bullet Pro made quick work of the cutting.  I added score lines down the center of each tree, to make folding them in half easier.   After folding, each tree was glued to the next, to form a dimensional tree.  I used spray glue to add glitter, and hot glued my tree into a vintage crystal drawer knob base.  A red ribbon bow adds a touch of color.

Tree number eleven:


This tree was fashioned after some Tim Holtz style trees that kept turning up on Pinterest.  I used my new favorite rosette file from My Scrap Chick to cut five rosette strips in graduated sizes.  After threading them with baker's twine I cinched them up into a cone shape, rather than the traditional flat rosette.  I added a bit of Tarnished Brass Distress paint to highlight the ribs of the tree. 

I rescued the puffy star from a former Fourth of July decoration.  It was red and faded so I painted it up with some Scattered Straw and Mustard Seed Distress Paints.  After they were dry, I applied some Tarnished Brass Distress Paint and hit it hard with my heat gun to bubble it up.  I love the effect!

And now for my final tree of 2014, number twelve:

What? You can't see the tree?  No you can't, because this is just a close up of the background.  I used my Wendy Vecchi Crackle paste, and I had to share a close up of the effect.  The base is a journal cover from 7 Gypsies, coated with Mod Podge and layered with tissue paper and gesso for texture and to lighten the color from the very dark brown original. 

After the Crackle paste had dried, I randomly stamped the background with a flourish stamp and Frayed Burlap Distress Ink.


Well, that's not the tree either!  Its the star on top.  It is the shabby Distress Inked star on top. 

Ok, so that's the tree!  I embossed a piece of kraft cardstock with a ruler embossing folder (from Darice, I think.) I cut apart the individual ruler pieces, added Distress Stain Picket Fence, Distress Inks in various wood tones, and black Archival ink to highlight the numbers.  I cut them to various lengths, and adhered them to chipboard to give them some them definition.  I used thick quick dry glue to adhere the strips and trunk to the background. 


I am really pleased with my tree stand.  I cut a rectangle of brown cardstock, and angled the edges.  after distressing and inking the edges with Barn Door Distress Ink, I added dimension to the stand by curling it with the edge of my scissors.  A touch of glue on the edges is just enough to adhere it to the background over the tree trunk. 

I wish you all a Happy and Crafty New Year!

Elizabeth

Sunday, December 28, 2014

My finished printer's tray...


Hello Everyone!

I hope that you all had a peaceful and beautiful Christmas.  I enjoyed the week thoroughly.  The days since I last posted have been filled with family traditions, crafting, eating, eating, relaxing, and after a full day of putting away Christmas decorations yesterday, I spent last night in the craft room, finishing up the printer's tray I have been working on.  Here are the last few photos:

 
I replaced one of the mirrored pieces in the lower left corner with this piece.  I used vintage book paper, washi tape, stamped Picket Fence Distress Stain, and some red rhinestones.  I think it is a better fit, style-wise.  

 For this tiny space, I was able to use one of the rejected backgrounds from one of the prior weeks.  The treasure here, though, is the holly that was stashed in one of my button boxes.  I love being able to use family ephemera, especially in special pieces that I plan to keep forever. 
 I love this Distress stained seam binding bow.  I pumped up the color on the jeweled center with some alcohol ink.  The background for this piece is another that didn't work earlier, but was too pretty to discard.
 If this one looks familiar, it is because it is half of my week four piece.  I really wanted to use the space it was in for the following piece, so I cut it down to fit a smaller space. 

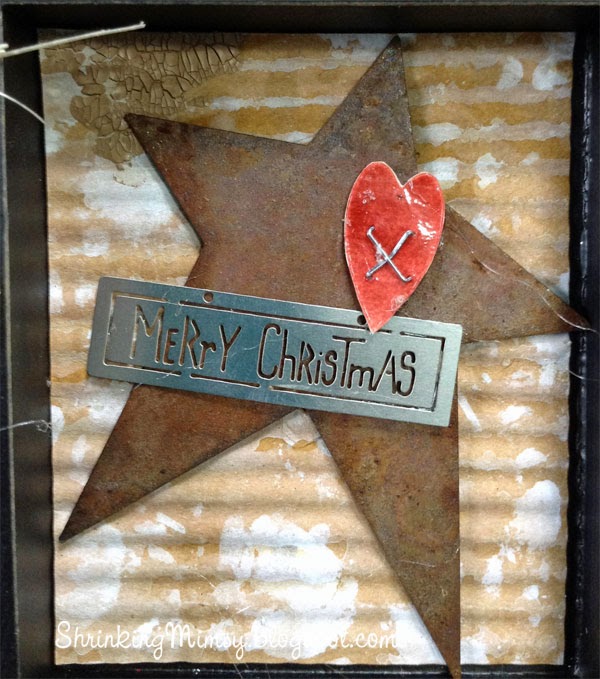
 I needed the bigger piece for this rusty metal star that I rescued while storing Christmas decorations.  I found the corrugated background in my stash, and added one of the hearts from the deconstructed week four piece, and a tiny little metal stencil that was also hanging about in my decorations, waiting to be used. 


This little square seemed to be the perfect spot for a tiny rosette.  You will see more of these when I get around to posting my final three trees of 2014 later in the week.  The center is a vintage tack from the button box, colored unevenly with alcohol ink to give it some holiday color.  The background is a piece of the vintage calendar that I also used behind the wreath in an earlier week.

And finally,

 
This is by far my favorite project of the year.   I am so happy that I was able to finish my personal card making challenge (5 cards per week for the entire year) early, so that I could focus on the Funkie Junkie 12 Tags of Christmas challenge.  I hope you have enjoyed following my progress.  I have already made it a goal to participate in the 2015 challenge.  I hope you will consider joining the fun. 

Today I made good progress on my final three trees for the year.  I hope you'll pop back later in the week to check them out.   I'm on track to get them posted before the New Year. 

Elizabeth


Sunday, December 21, 2014

12 Trees of Christmas Day 7


Hello Everyone!

Hope you're all having a terrific Sunday!  I recently got the idea for this adorable little tree.  It is my twist on a stacked box tree that I saw on Pinterest, which featured square boxes.  I thought it would be fun to do it with a pillow shaped box instead, and I was right.  I had a blast with this entire project, from designing the cut file, choosing papers and cutting them, to making the tiny origami lucky star for the top. 

I also had fun altering a tiny little apothecary bottle.  I "painted" it with ModPodge, and sprinkled on copper colored teeny weeny beads.  It wasn't quite as dark as I wanted, so after it dried, I dabbed on more color with Antique Bronze Distress Paint.  Some of the beads came off during the process, and added to the distressed look. 

The bow is the remaining half of the piece that I was gifted with my recent Funkie Junkie Boutique order.   I used the first half in one of my projects for the Funkie Junkie 12 Tags of Christmas challenge. ( I hope you are not tired of hearing me talk about that challenge.  I am so pumped up about it that it will probably be February before I stop mentioning it!)


 I pulled all  of the papers from my Christmas paper scrap drawer.  The largest pillow box is about 2.5 inches wide, and the smallest is less than 3/4 of an inch.  I used my SCAL software to easily add circle cut outs to the top and bottom of each box for inserting a skewer to hold it all together.  Of course, all the boxes were cut with my Silver Bullet Professional cutter.  A spray of glimmer mist and some quick hot glue assembly and tree number seven was done!

Thanks for stopping by today.  Wishing you the peace and joy of the season,

Elizabeth

Saturday, December 20, 2014

12 Days of Christmas Trees Day 6


Happy Saturday, Everyone!

Hope you had a terrific day.  The little tree I am sharing today has been sitting undecorated on my work table since late this past summer.  


To make it, I coiled a single vintage style chenille stem around the top of a tree shaped paper mache cone.  I removed the shaped tree, and used hot glue to attach a shorter piece of stem as the "trunk".  I inserted it into a small wooden spool, and there it sat.

This afternoon, I finally found time to decorate it a bit. 
To make my garland, I strung E sized seed beads onto a fine gauge gold wire, giving each bead a twist to secure it in place.  I aged the spool by sponging on a bit of Distress Ink in Frayed Burlap.  I glued on a strip of vintage dictionary paper and tied on a bit of red ribbon. 

If you are looking to squeeze in one more project this year, this may be the way to go.  It is super quick and easy, and very fun!  It would be a terrific project to do with the kids.

I'll leave you with one more view of my miniature Christmas tree:


Happy Weekend Before Christmas!

Elizabeth

Thursday, December 18, 2014

12 Trees of Christmas Day Four


Hello Again,

How about another Christmas tree? 


Today's tree is an embellished bottle brush tree in a vintage glass vase base. 

I used alcohol ink to dye beads and glued them amongst the "branches" with hot glue.

 
A Distress Stained bias tape bow with some paper twine tied in, a Tim Holtz Idea-ology charm, and crumpled antique book paper in the vase add to the vintage charm of this tree that has quickly become a favorite of mine.
 
Thanks for stopping by to check out today's installment of my 12 Trees of Christmas!
 
Elizabeth
The Funkie Junkie 12 Tags of Christmas 2014 - Week 12


Hi Everyone!

I am excited to post my final Funkie Junkie 12 Tags of Christmas 2014 project.  I wish I could tell you how much fun this challenge has added to my Christmas season.  I had to think "inside the box" to find ways to fit Linda's always amazing inspiration tags into the small spaces in my 7 Gypsies Printer's tray.  I am so happy to have found the perfect occasion to use this hoarded item.  (Best of all, I have two more trays, so I can complete one for each of my daughters.  Linda - Please, Please, Please continue this challenge for at least the next two years!)

There is still a little time left for you to join the fun.  Perhaps like me, you work well under pressure?  (that's code for "I'm an experienced procrastinator".)  You can find out about the deadline and the other requirements here.   In her final challenge post Linda graciously reminded participants to check the details to make sure we are posting correctly.  I found that I needed to go back and fix a couple of things that I had missed. 

Here is the Funkie Junkie's Week 12 Inspiration tag:

  So Sweet!  There is a tremendous level of detail here.  From the tiny poinsettias in the window box, to the vintage crackles on the pediment and texture on the window.  And that wreath!  I LOVE that wreath. 

I knew immediately that I would be recreating the window element.  Because there is depth to my printer's tray, I was able to create a shadow box effect.


These are the two main components.  I used my Silver Bullet cutter to cut many cardstock elements, and lots of Distress Inks to add details.  I created dimension in the trees by adhering them with varying levels of foam tape. 


Here is my assembled piece.   This scene very closely resembles the view of any of the windows in our house in the woods, including the black and grey tiger cat on the sill. 

Here is my printer's tray with all 12 Funkie Junkie 12 Tags of Christmas inspired pieces.


 Having extra spaces to fill is making me happy, because I'm really not ready for this project to end. I plan on completing it during my time off at Christmas. 

You will find a wonderful collection of supplies and embellishments to create your own projects at the challenge sponsor, The Funkie Junkie Boutique.  You should go have a look around at all of the fabulous things you can stock up on at terrific prices.  Gift certificates are available, and I'll bet there is still a smidgen of time to ask Santa for one! 

A huge thanks to Linda Coughlin, the Funkie Junkie, for the opportunity to participate in this challenge.  Her inspiration each week prompted me to try new techniques and spread my creative wings in ways I never imagined.  My level of excitement for crafting in the  coming new year is even greater than usual because of the sparks of inspiration Linda has ignited.

Happy week before Christmas!

Elizabeth


Wednesday, December 17, 2014

12 Trees Number 3, and some little gifts


Hi Everyone!

I'm back with another of my 12 Trees of Christmas.  This one couldn't be more different than yesterday's.


It's tiny!  And it's "Tim-y"!  Except for the ribbon, everything you see is from the Tim Holtz Idea-ology line.  The tiniest of the bottle brush tress fits perfectly in the glass dome.  I glued a shiny star on either side of the tree top, shook on some glitter, and added some Distress Inked ribbon to the bottom of the cork. 


This little project couldn't have been quicker or easier, and it is perfect to tuck into one of the many nooks and crannies that I decorate for Christmas.  If you wish, you could add a hanger and use it as a tree ornament or trimming for a special package.

In case you hadn't noticed, I just adore Christmas crafting, and in the midst of the season, I just can't seem to stop.  Fueled by cookies, caffeine, and Christmas joy, I spend every spare moment in my craft room.  Here are some projects I created this week to share with my co-workers.

This adorable barn gift box is from the Santa's Village kit from SVG Cuts.  It's so cute as is, I didn't feel the need to change it up at all.  I used one of Mary's (The owner and chief designer of SVG Cuts) tips, and used coordinating papers for all of the individual pieces.  It makes choosing papers super simple (especially since I had already used much of this Recollections stack from a couple of years ago, and didn't have too many pages left to choose from.) and gives my project a really cohesive look. 

My next project was really fun to put together:

I used a recently purchased Rosette set from My Scrap Chick to make the 5.5 inch diameter rosette.  I had never tried a "sewn" rosette, thinking that it would be  more difficult than gluing.  Boy was I wrong!  The PDF instructions were terrific, and using baker's twine for assembly was totally quick and easy, and I didn't burn even one finger!  I layered two sizes of dimensional star for a fun look.  I used my Silver Bullet Professional to letter and cut the Peace banner.  It's been a while since I have used my pen tool.  I'm going to have to bust it out more after Christmas.  Especially since SCAL cutting software from Craft Edge  just came out with version 4, which has some nifty drawing feature updates that I'm anxious to try out. 

And finally, this morning I cut and assembled four of these:


I have been having fun with these little boxes this year.  I saw lots of these little boxes on line and was lucky to find a cut file to use.  Because with my Silver Bullet and SCAL software I don't have to rely on dies,  I am not limited to specific sizes.  I cut these boxes at about 8 inches, so they would be large enough to tuck a little packet of home baked goodies into when assembled.  The other night, I cut them at 4 inches, so that the finished boxes were small enough to tuck into the girls' Advent Calendar spaces.  They were adorable in that tiny size, and I was able to fit several M&M's inside. 

Thanks for popping in today.  Stay tuned for my 12th and final Funkie Junkie 12 Tags of Christmas 2014 project soon, and more Christmas trees, too, of course!

Elizabeth

Tuesday, December 16, 2014

A very unusual tree....


Hi Everyone!

Today I have a unique tree for you.  Sometimes there are very good reasons for things to be one of a kind, and this tree is a perfect example of that.  So, even though I think it is quite hideous, and way past "so ugly it's cute", I am bravely sharing it!   Maybe it will spark an idea in someone's crafty brain.  If not, at least you all will have one project that you can leave off your to-do list. 


Last year, I was excited to rescue some vintage bed springs before they got hauled to the dump.  I had seen lots of really cute projects, and I was sure that I could make some for myself.  After three not so good projects, I am about ready to give up on those plans. 

My family drinks a lot of tea, and as you may have noticed, sometimes the tea bags make their way into my projects.  Mostly they are bit players, but with this project, I decided to make them the star of the show.  Over a couple of months, I saved all the tea bags, dried them, removed the tags and staples and emptied out the tea.  Then I tore each bag in half lengthwise and twisted it into a rope shape.  I knotted each rope onto the spring to replicate evergreen needles. 

The simple red berries were another save from a friend's recycling pile.  

At least I didn't spend a  single cent on this project!

Maybe it looks better with a fancy photo booth photo.  Not so much; see? 


Thanks for visiting today.  I'll be back tomorrow with what I think is a much prettier tree number three!

Elizabeth