Showing posts with label Thrifty. Show all posts

Tuesday, May 26, 2015

Guys from the Attic Mini Album - A project that makes me Happy, Happy Happy!


Happy Tuesday, Everyone!

I hope you are having a terrific day!   I am finally ready to share the project with which I have been teasing you with sneak peeks.  The project itself was very time consuming, but oh so fun to create!  It is a Playful Pocket Flip Mini Journal honoring the guys in the attic.  (Full disclosure:  These guys aren't really in the attic; just their photos and little bits of their stuff.)


This is the completed front of the album.  When working on the album, I found the giant washer in a parking lot. With some Remnant Rubs, it makes the perfect grungy charm to hang from my Idea-ology measuring tape ribbon "belly band". 

 All of the papers are from the Tim Holtz Idea-ology Lost and Found Collection.   Rather than uploading the 30 or so photos I shot and edited, I decided it would be more effective to share a video.  This is my very first craft video, so judge accordingly!


I kept things really simple, so that the photos and ephemera would be the stars.

Here are a few photos of the highlights:

 These guys like cars.

 
These guys are serious about their farm business.

 
These guys like rusty numbers.  (No wait, its me who likes rusty numbers!)

 
These guys like fishing. (I love my Wendy Vecchi Crackle Paste and Distress Ink.)

 These guys love their girls. 

 
These guys love train travel.  (I love that this album has pockets for extra ephemera, like this Distressed TH bingo card!)

 These guys love a road trip.  ( The atlas is a copy from an original from the attic. I shrunk it a lot to make it fit.)
 
 These guys love each other! They are brothers, cousins, friends, and it is clear that they love spending time together. 

 
These guys love looking spiffy!  The razor blade it is a bit less dangerous in its new custom holder than it was in the bottom of the vintage sewing basket I found it in.  (The ads are from the internet.)

 
These guys love their pets! ( I love this 1955 dog tag that I found in a button box.)

These guys love mail.  (I loved finding a spot for this pen nib  and stamps that I found in the attic.)

The theme of the current challenge over at the Frilly and Funkie blog is Happy, Happy, Happy!  Here is hostess Georgie's description:

So this is the theme :) This could be a project you love doing, a product you love using, or something that makes you so happy that it just gives you the inspiration to create something beautiful. It really is an anything goes kind of challenge, but remember to make sure you have fun!!
Oh boy!  This theme perfectly describes how I feel about my Guys from the Attic mini album.  From the surprisingly rewarding hours I spend sorting and organizing my family's attic, to combining the junky little bits that I collect there with my Idea-ology and Distress products, to making up stories for my own personal "found relatives", this is the best crafting "happy" I can imagine. 


I made the mini album base by following this video tutorial:

https://www.youtube.com/watch?v=R9C6YAqjUvw

It's really quite simple to assemble, but it takes a bit of a commitment to fill all of the pockets and pages. 

Thanks for stopping by, and sticking with me (if you're still here!) through this rather long post.  I wish you all a beautiful week!

Elizabeth

Tuesday, April 14, 2015

A second mini album...


Hi Everyone,

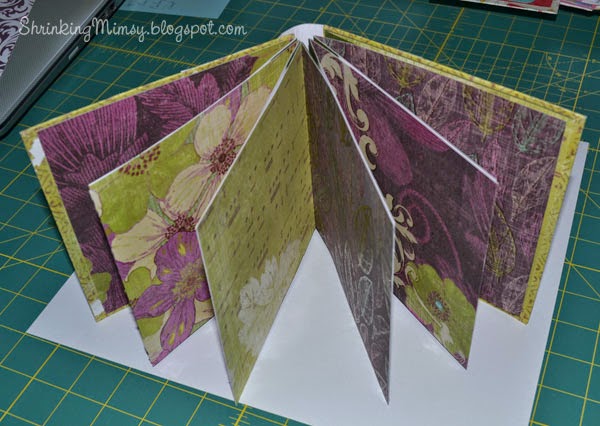
I hope you all are enjoying your week.  I have another mini album to share today.  I have been playing around with different binding techniques to see which I prefer.  The jury is still out, but this one was quite easy, and didn't require any special supplies. 


 I really enjoyed choosing these pretty papers.  All but the small print on the covers is from the Meadow Night stack by the Paper Studio.  I needed a lighter weight paper to cover the chipboard covers, and was lucky to find this piece from the Tattered and Worn stack from Recollections to match perfectly with the heavier page papers. 


I found the instructions for this easy mini album here, on the Graphics 45 blog.  My spine is similar to the one I found here. I chose not to embellish this mini (again) because I'm not sure what the final use will be. 

I have one more completed journal/album to share, and at least a dozen ideas for more dancing in my head, so I will likely be back again this week with more projects to share.

I'm so glad you stopped by today!

Elizabeth

Wednesday, January 7, 2015

A winter wonderland project for a very cold night...


Hello Everyone,

I'm popping in to post a project in between trips to the basement to stoke the fire.  In my neck of the woods, we are in the midst of a cold snap.  The weather peeps are predicting a low of 10 to 15 below zero overnight.  It's totally ok with me if they are wrong about that! 

Here is my latest project.  I dug into my pile of alterable items and my stash of vintage postcards and family photos for this one:

 
My "vase" is a peat pot, covered in gesso.  I pulled some die cut paper doilies out of my scrap box, sprayed them with water and Distress spray, crinkled and uncrinkled them, dried them, and glued them around the peat pot.  I tied on a charm rescued from a broken bracelet with some rustic twine. 

Flowers just didn't seem right for this time of year, so I cut a bouquet of  dimensional
snowflakes and stars with my Silver Bullet electronic cutter, (my favorite crafting tool) and sprinkled on some glitter.

This is one of my favorites from my collection of scanned vintage family photos.  That's my mom and aunt and two of their cousins on a toboggan in front of the family farmhouse.  I just love it, especially the scarves my mother and aunt are wearing on their heads.  My grandmother really knew how to bundle a kid up.  She put the same scarves on my sister and I when we were little.  Probably on my brothers, too, if she could get them to stand still long enough!  I might just have to find a wooly head scarf if I have to go out in the cold tomorrow. 

These two images are winter themed vintage trading card from the late Victorian era.  I have a collection of them that were collected by my many great aunts and uncles.  I scanned these two, edited the color to sepia tones, inked the edges with Brushed Corduroy Distress Ink and added a border of Rock Candy Distress Stickles.  Finally, I mounted them on a background of bright white cardstock.
 
All of the sparkly elements were mounted on white plastic coated wire.  I created my own "frog" by cutting a piece of corrugated cardboard from the Christmas trash(We recycle it, so I didn't have to dig through the trash. Not that I'm above that.  I had to go digging at work today, to find the center of the tape dispenser.  I threw it away with the empty tape core!), rolling it up, and painting it with gesso to blend with the peat pot.  You can see it here, in this view from the top:
 

I discovered the extra long corsage pins while digging in my charms box.  I think their pearly white beads add the perfect finishing touch. 

One of my goals for 2015 is to enter more challenges, so I am linking up to the following challenges:
Frilly and Funkie Anything Goes Challenge,
Lessology's Challenge number 43, Cardboard Central,
and
Try it on Tuesday "My Favorite Things" challenge. 

Thanks for spending some time with me today.  I hope you are cozy, and find time to be crafty!

Elizabeth


Monday, December 22, 2014

12 Trees of Christmas Day 8


Hi Folks,

For tree number eight, I am back on the "interesting" side of things, with another reclaimed junk tree.

 Can you tell what "junk" I used for this one?

How about with a close-up?

If you guessed vintage pattern paper, you are correct.  I crumpled and twisted rescued pattern paper into long ropes, Dyed them with Distress Stains, and coiled them around a paper mache cone.  Next I glued on more rescued items.  These pretty red pairs were originally wired on to a 80's era flat rattan Christmas tree.  The gold glass balls were on wreath picks from who knows when.  I sure am happy that I rescued them from a friend's trunk full of junk!  They are perfect on this recycled tree.  The only new item is the cone, and that was purchased during an after Christmas clearance sale at 90 percent off.  I can make cones, but it was totally worth the 30 cents I paid to get such a nice sturdy one. 

I'm calling this finished, but I'm still on the look out for an appropriately junky tree stand or trunk for it.   Christmas is oh so close, and I haven't given up on projects yet.   Almost all of my big "have to do" tasks are done, so I should be able to sneak in a few more hours of crafting.   Hope you can too!

Elizabeth

Tuesday, December 16, 2014

A very unusual tree....


Hi Everyone!

Today I have a unique tree for you.  Sometimes there are very good reasons for things to be one of a kind, and this tree is a perfect example of that.  So, even though I think it is quite hideous, and way past "so ugly it's cute", I am bravely sharing it!   Maybe it will spark an idea in someone's crafty brain.  If not, at least you all will have one project that you can leave off your to-do list. 


Last year, I was excited to rescue some vintage bed springs before they got hauled to the dump.  I had seen lots of really cute projects, and I was sure that I could make some for myself.  After three not so good projects, I am about ready to give up on those plans. 

My family drinks a lot of tea, and as you may have noticed, sometimes the tea bags make their way into my projects.  Mostly they are bit players, but with this project, I decided to make them the star of the show.  Over a couple of months, I saved all the tea bags, dried them, removed the tags and staples and emptied out the tea.  Then I tore each bag in half lengthwise and twisted it into a rope shape.  I knotted each rope onto the spring to replicate evergreen needles. 

The simple red berries were another save from a friend's recycling pile.  

At least I didn't spend a  single cent on this project!

Maybe it looks better with a fancy photo booth photo.  Not so much; see? 


Thanks for visiting today.  I'll be back tomorrow with what I think is a much prettier tree number three!

Elizabeth

Monday, June 2, 2014

Something different


Hi Everyone!

Happy Monday!  Today I am  posting a project that couldn't be more different than my last posted project.  It is an assemblage piece that I made this weekend for my house:

When I finished it, I decided that it really suits my style.  (I decided that about the really bright journal page, too.  I think that what I consider to be my style really depends on what kind of project I am working on at any given time.) 

When Junking, I am really drawn to rusty metal pieces, like the fork and the scroll-y cast iron piece.  I discovered both of them in a grab bag style jar of stuff that I picked up for $5.00 last summer. 

My base is a piece of distressed corrugated cardboard with gesso.  I added some Archival Ink stamping to some recycled tea bags, and collaged that over the dried gesso with matte medium.  To make the tiny oval frame, I used a Mod Podge mold and my hot glue gun.  When it was cool, I popped it out and added many layers of Distress Paints until it looked "right".


The vintage rolled papers are scans of the originals, all pieces from my personal attic treasures collection.  The Scrabble tiles are also from the attic.  I'm not sure where I found the zero that I used in place of an "o".  I have lots of  "o's" but I like the variation I got with the different tile. 


I toyed with changing the finish on the frame, but when I finished assembling everything, the original color seemed perfect.

This piece is now hanging in one of the boxes in my new "wall o' boxes".  I don't think I shared a picture of it yet.  My husband very patiently hung all 17 boxes a couple of Sunday afternoons ago. 


I have been playing around with accessories ever since.  This is an early photo, and most everything has changed now.  My assemblage piece hangs in the upper left box, which is the lid of a rescued silverware box.  The bottom is in the lower right corner. 

The tin tray now looks like this:


I used individual boxes from a Tim Holtz Configurations Printers Tray.  I used layers and layers of Distress Paints, using all of the metallic colors, plus black.  I love the aged patina that I got. 

Here are some close ups of the different elements:

 
An awesomely shabby silver salt shaker


A couple of grungy keys, shadow box style.

 A collection of clock parts, a tiny watch part tin, and a game piece framed with another hot glue frame.  Again, lots of colors of Distress Paints applied. 
Here is another watch part tin. 

I attached the boxes to the metal tray using magnets. 

Hope you all have a wonderfully creative week!

Elizabeth

Wednesday, April 23, 2014

Catching up on the 12 tags of 2014


Hi Everyone!

Happy Hump Day!  I took some time last weekend to catch up on Tim Holtz's 12 Tags of 2014.  After making the January tag, I let a couple of months slide by without a  tag made. 

I will start off by sharing my version of  this month's tag:

 See Tim's tag tutorial   for his fabulous tag and instructions.  I followed along as closely as possible using what I had on hand.  (Thanks to Mr. Holtz's excellent salesmanship, I have plenty of supplies to play with!)  There were lots of Distress products on my craft mat! 
 

As an alternative to the pinecone rose, I used Ms. Penny Duncan's SVG file, and my Silver Bullet Professional cutter to make my little roses.  I have some philosophy tags, but simply couldn't resist adding the butterfly to the trellis as my metallic element.  I enjoyed every minute while creating this tag! 

I think I'll continue in reverse order, and share the March tag next:

 
I love the idea of using second generation stamping to create a second tag.  It really speaks to my frugal nature.  I was late with these tags because I hemmed and hawed all throughout April about purchasing these stamps.  I am trying really, really, hard not to spend money on new craft supplies this year.  As you can see, I caved in to myself, and purchased the Nature Walk stamp set.  I like to work on smaller tags, so this set is perfectly sized for me.  As a bonus, it includes an absolutely adorable silverware stamp that I can't wait to use!  I'm almost certain that this is my favorite stamp set to date.  I am totally in love with it!

I don't have the Distress Marker Spritzer tool, so I substituted a stencil and Distress Re-Inker spray for that step.  I had a package of mini numerals calling out to be used, so they got colored with a bit of Distress paint and popped on.  I added Distress Painted bird house and washer charms to the seam binding tassels.

I really like these soft and simple tags.  They have a definite spring feel.

And finally, the February tag:

I had nearly forgotten that Distress Inks could be used to emboss, and was happy to have a reminder.  This is a really fun background technique.  

I don't have the supplies to do Tim's chalkboard technique, and improvised with white embossing powder.  I rubbed on some white chalk to "real it up" a bit.  I added glitter and Distress ink to some
grunge letters, with Glossy Accents as my adhesive.  I am really starting to love this stuff.  It will be time soon to restock with a bigger bottle.  The bottom border and ring reinforcer are embossed foil tape with Distress paint, and the metal embellishment is a random piece from my stash. 

There!  I am happily caught up with my 12 Tags of 2014, and looking forwarded to seeing what Tim has in store for May.

Thanks for stopping by my blog today!

Elizabeth

Sunday, April 13, 2014

The Documented Life Project Week 15


Hi Everyone,

Hope you had a terrific weekend!  The week fifteen Documented Life Project challenge was to use tints and shades of one color.  Here is my page:


I really enjoyed building up the layers on this page, and clustering elements from my scrap boxes in the lower corner of my page.  I'm glad that the challenge specifically mentioned shades, as it prompted me to add some really greyed out pinks to my red color scheme, which makes it much more interesting.

 I got extra mileage out of the playing card by cutting off the white border and using it as a frame for the stamped and fussy cut umbrella man.  The geometric border and the "wish" tag were cut with my Silver Bullet Pro.  They were both in my scrap pile, and happened to be the right color, as were the tiny scraps of washi tape that I used to embellish the frame.  I finished my page by adding a song lyric quote and some bits and pieces of ribbon and some white oil paint marker dots. 

Thanks for stopping by to check out my progress!

Elizabeth

Wednesday, February 12, 2014

Yet another "heart" card


Good Day, Everyone!


As you can see, I have another heart card, but with a different color scheme than the last few.  For this card, I started with one of my inky backgrounds.  I cut it to size, added some Distress Stains and inks, decoupaged dictionary paper, Tim Holtz background stamping and a couple of heart stamps as a focal image.  All of my stamping was done with Archival inks.  I added a double organza bow, mounted it on an embossed layer and the base, and there you have it. 

Here is a peek at the inside:

Just some arrow shaped layers, and a printed and cut (with my Silver Bullet Professional digital die cutter) sentiment. 

Here is another view of the front. 
 
 
I feel pretty thrifty when I use my saved photo storage box index cards to soak up the leftover ink and paint on my craft mat. ( I discovered that it is only the boxes from Michael's that have the index cards, and not the ones from A. C. Moore) I always have a few close at hand, and love using them for quick card or tag backgrounds.  It's a terrific way to experiment with unusual color combos, and hey, if it's really ugly, I just throw it away without feeling too wasteful.  If I want to be extra super duper thrifty, (and sometimes I do!) I  just paint over the mess with some Gesso and start over. 
 
I hope everyone finds some time and energy for some thrifty crafting this week!
 
Elizabeth
 
Tools and Supplies used to create this project include:
Silver Bullet Pro Digital Die Cutter
Tim Holtz Stamps
Distress Stains and Inks
Vintage and new paper from my stash
Ranger Archival Inks


Monday, February 3, 2014

Looking like Spring!


Hi Everyone!

Happy February to you!  Today I am sharing a card that features some Spring colors:


All of the papers and the die cuts are from my stash.  I had fun using my Distress Inks to adjust the colors so that everything would coordinate.  That is one of my favorite uses for Distress Inks. 
 
This picture shows how some of the elements before adding the ink:


I used Picket Fence Distress Stain to the leaf before recoloring it.  The button was cut using a Martha Stewart punch.  It is one of the very few punches I own, since I find it so much more fun to use my Silver Bullet Pro electronic cutter to cut my shapes. 
 
A peek at the inside:


Hope you all have a beautiful week!  Thanks for stopping by!

Elizabeth

Wednesday, January 29, 2014

At least these colors are warm!


Hi Everyone!

Today I have a card that features some warm colors, in a nice contrast to the temperatures outside.  Brrrr!  It has been a cold winter here, but very beautiful.


For this card, I used a "stencil", (the negative space left over from a digital die cut) and placed some Pan Pastel flowers on a patterned paper. 


I added some layering and a coordinating organza bow, and my card was finished.  Easy-peasy-lemon-squeezy!

The inside:

 
And a final view of the front:


Have a terrific day!  Stay warm!

Elizabeth

Supplies and tools used to complete this project include:
Papers from my stash
Organza Ribbon
Pan Pastels
Paper Distresser
Distress Ink- Walnut
Corner Chomper
Digital Die Cutter