Showing posts with label Tags. Show all posts

Saturday, April 11, 2015

Je t'aime, mon cheri.


Hello Friends! 

Thanks for stopping by today.  Back when I was an avid quilter, I learned that if I didn't finish one project before starting another, I would likely never have a completed project.  So typically, once I start something, I finish it within a reasonable time frame.  Recently, though, there have been a few UFOs piling up in my craft room.  I finally found time to put the finishing touches on one of them. 

Today I am sharing a mixed media project that came together recently after a long stint on the "unfinished" shelf:


The inspiration for this project was the fun collection of things that were included as a thank you gift when I placed an order at the The Funkie Junkie Boutique.  I just loved the vintage book paper butterflies, and the pink floral button that you see towards the top of the piece.  It definitely inspired the color scheme for this project.  I had picked up the shallow wooden shadow box on clearance at the craft store, and thought it would be fun to alter. 
 
I started by creating my tag.  I painted the manila base with Distress Paints in several pinks and vintage photo.  I cut a piece of packaging plastic to size and embossed it with a Tim Holtz embossing folder, and painted the raised areas of the reverse with gesso.  To this, I attached the die cut butterflies using my tiny attacher, and the ticket, which was also a surprise from the Funkie Junkie, to which I added the tiny butterfly stamp and Distress Inks. 
 
I finished off the tag with some Distress dyed seam binding and a vintage rhinestone hair pin.  I think it looks like a butterfly, with the ribbon wings and hairpin body.  Here's a close up of the hairpin.  I just love the art deco simplicity of it. 
 
 
The paper "doily" that peeks out from behind the tag was cut with my Silver Bullet Pro digital cutter.  I wet it, crumpled it, and inked it with Distress.  While it was wet, it picked up color from my craft mat, and the end result coordinates even better with my tag than if I had planned it! 
 
 
I love buttons, and had fun scattering them on my project.  Most of them are from my vintage collection.  In this next photo, you can see how I altered the shadow box:


I first painted the bare wood with gesso, and  aged it with Distress Inks.  I gessoed a piece of striped patterned paper, and randomly stamped it with the text stamp from Tim Holtz's Apothecary stamp set and tree branch archival ink. I also stamped the edge of the shadowbox for added interest. 

Finally, I added a bit of French flair with words cut from a Prima ATC base and a Distressed paper rose.  I love cutting my flowers from white paper, and inking them with Distress inks and stains before assembling them. 

After missing a couple of challenges due to my busier than usual schedule, I am happy to enter this project in the Frilly and Funkie Spring Time Die Cuts challenge, especially since it gave me the opportunity to use Linda's die cuts! 

I am also entering the Hiding In My Craft Room challenge 195, Super Scraps Saturday.  My "scraps" are the doily, which is from my box of leftover die cuts, and the plastic layer on the tag, which was rescued from my garbage can. 

I wish you all a beautiful day!

Elizabeth

Monday, March 9, 2015

Soar


Hello Everyone!

Happy Monday!  I had time recently to try out Tim Holtz's March 2015 tag.  I sure am loving his background techniques this year!  They are so much fun to make, and very versatile.  I'm sure to be finding uses for them all year long.  I followed the instructions as closely as I could with what I had on hand, changing up the colors and stamps to match my style and stash. 

Here is my version of the March Tag:


I used a combination of Idea-ology, new metal items, and vintage metal snaps and buttons from my stash.  The round blue item is a vintage thumbtack in the perfect color to match the Stormy Sky Distress paint I used to color some of my Idea-ology findings. 

 
I used bird stamps from the Nature Walk set,  and Distress Painted Alpha Parts letters.


Now that I've finished this month's project, I can't wait to see what techniques Tim will be sharing with us in April. 

With this project, I will be linking up for the first time with the Shopping Our Stash challenge. I love a challenge that encourages me to use up what I have.   The current challenge, #191, is to use our oldest metal stash.  I have used metal snaps and buttons that are far older than I am!  They have been in my stash for at least 20 years, and resided in the attic of my parents; home for many years prior to that.  I like to think that my frugal ancestors would appreciate that I have used these carefully saved and long hoarded buttons in this way. 

Monday, January 5, 2015

New Year, New Project....


Happy New Year to All!

I am starting off 2015 with a few crafty commitments, one of which is to complete all twelve of Tim Holtz's monthly tags.  Here is my version of his January tag.


Rather than a tag, I have decided to create pieces to fit this "frame". ( Actually it's the door of a jewelry box that I picked up at the thrift store and broke down into several alterable pieces.  At some point I'll give the frame a more neutral finish, but the orange tones work with this piece, so I can put that off for this month.) 

I was intrigued by Tim's background technique, and followed his detailed tutorial quite closely, using stamped tissue paper rather than tissue wrap.  This was important to me, as my main challenge for 2015 is to make do with supplies on hand, rather than purchasing anything new.  I have plenty of stash, so the hard part of this challenge will be breaking my shopping habit. 

I used my Silver Bullet Cutter and Sure Cuts A Lot software to cut the numbers. 

 
The 15 was cut from gray cardstock.  I embossed it with the Tim Holtz Alterations folder Cracked, then dry brushed it with the Distress Paint colors I used for my background, Evergreen Bough and Mowed Lawn. I spritzed it with water and brushed on a bit of antique silver Perfect Pearls, then lightly applied black soot Distress Ink to the edges.  I backed it with black cardstock to make the number stand out, and popped it up with foam squares.
 
 
I filled the space under the arch with a quote, stamped on a wrinkle free distress background with Archival Ink Leaf Green.  I sparkled it up with a generous layer of Rock Candy Distress Stickles, before layering it with more black cardstock.  I used Distress Paints in Frayed Burlap, Gathered Twig, and Black Soot to give an aged patina to the binder clip. 
 
 
As Tim did in his inspiration, I added  Distress Stained chit chat words, a metal embellishment, and mirrored stars to complete my January 2015 framed art piece. 
 
As always, I am happy that you spent some time with me today.  I wish you all a very happy and healthy 2015!
 
Elizabeth


Friday, March 14, 2014

Lots of cards today! (Edited to change out the card I had already posted!)


Hi Folks!
 
I'm changing things up a bit this week, and sharing five cards at once instead of one each day.  Just trying to keep things interesting for myself.    


Blue cards make me think of my mom.  She Loves (yes, with a capital L!) blue. 
 
 
 Yes, it's another Valentine!  I love embossing.  It is such a quick and simple way to add interest to a clean and simple card.  The stamp is an oldie from Stampin' Up. 
 Another print and cut sentiment.


This was a fun card, with elements cut with my Silver Bullet Professional digital die cutter.  To make the card base, I used a shamrock from the basic shapes in my SCAL software. ( I used the "off cuts" to embellish the inside.)  I traced the horse shoe from an online graphic and added a shadow.  The larger shamrock is a freebie from SVG Cuts. 


Another St. Pat's card:
 
 This card started with a chipboard tag that I rescued from my husband's new shirt.  I added layers of vintage book paper, Distress Ink and lots of elements cut with my Silver Bullet.  You may recognize the shamrock element.  It was a test cut from the card above.  I really hate to waste anything!  I mounted the tag on a base of Distressed and embossed cardstock. 


 Here's a close up of some of the details.  I made the tag with chipboard, Distress paints and inks, and a set of metal alphabet stamps.  The little frame is made with hot glue.  I picked up some ModPodge molds at Michael's recently.  I colored this one with alcohol inks in greens with a touch of gold.


A layered print and cut sentiment finishes the inside.
 
And finally:
 I gathered some strippy scraps for this card.  I glued them to a base, and layered a die cut shamrock with shadow frame over them.  I finished off the card with some Distress inked dry embossing, and a print and cut label.
I repeated the print and cut label for the inside of my card.  I am really enjoying using Sure Cuts A Lot software to design and cut my cards with my Silver Bullet. 
 
Hope you enjoyed looking at my collection of cards today.  Thanks for stopping by!
 
Elizabeth


Friday, February 7, 2014

Christmas Corner


Hello Folks!

It's Friday!!!!  I have another of my weekly Christmas cards to share today:


I fell for the Simon Says Stamp December Card Kit, with it's exclusive limited time availability Tim Holtz stamp set. Great marketing! I don't regret it.  It was filled with Tim goodies.

I colored the tag with swipes of Distress Stains that I dried and covered with a layer of Picket Fence stain to soften the color and allow it to coordinate better with the lovely vintage colors of the District Market card base.  I brushed on a swath of Peeled Paint Distress Crackle, and allowed it to dry before stamping the fabulous horse and sleigh stamp with black Archival. 


I love Distress Crackle.  Did you know that if your jar has started to dry out and thicken, you can just stir in a bit of water to revive it? 

I added the Merry Christmas stamp from the kit, and some ribbon from my stash before adhering the tag to the card base. 


For the inside, I added a different TH sentiment stamp with Olive Archival.

Here is a final view of the front:


Are any of you getting a head start on Christmas cards this year? 

Have a lovely day!

Elizabeth

Friday, January 24, 2014

Christmas Corner and a Tim tag


Hi Everyone!

Today I have another Christmas card to share:


I tried out a new stamping technique for this card.  I dabbed Distress Stains in various colors directly on my stamp and then stamped onto my paper.  Easy Peasy!  I love the result.  I simply added a text stamp with Archival Ink in coffee, and some Distress ink on the distressed edges.  I finished this card off by adding some Ideology rick- rack trim and mounting it on a card. 
 
 
Here is the inside:


Just some simple layering and a sentiment. 

And now for my version of the Tim Holtz January Tag:

 
  I followed Tim's tutorial, using supplies that I have on hand. 
 
Here is my background:


I used Brushed Pewter Distress Stain as a base, and stenciled a layer of snowflakes with Pumice Stone Distress ink.  I thought my tag needed another layer, so I stamped the blueprint snowflake with Watering Can Archival.  That made me happy.  I stamped my numbers with black Archival.  I sanded them a bit, as I did the "time" text, which is a Remnant Rub. 

For my main focal piece, I used foil and Black Soot Distress Paint.  This photo is from my "attic treasures" collection.  I think these fellows are perfect for a January tag.  They certainly look ready for the Polar Vortex!   I cut a piece of mica to highlight the photo, and attached it to the foil piece with brads. 

I added a type charm and a Philosophy tag to my grosgrain and floss trim.  I used Distress paint to highlight the text on the tag. 

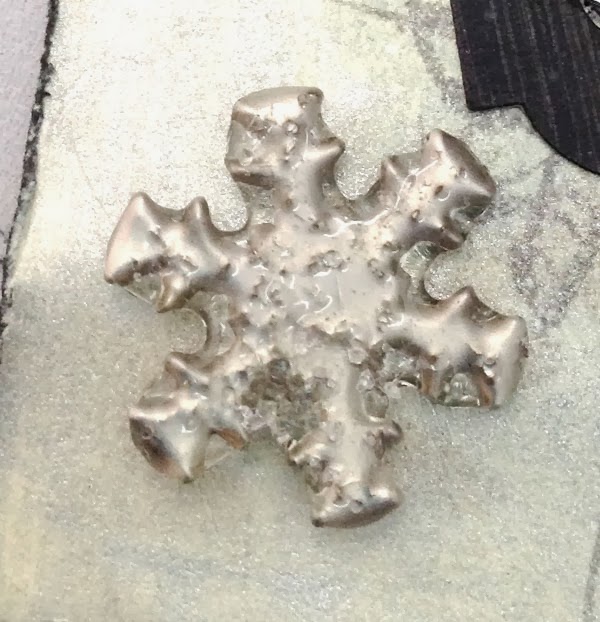
As final detail I added this snowflake brad.  I wanted some extra texture, so I heated it up with my heat gun and dipped it into a pile of UTEE until it was covered to my liking.  When the final layer of UTEE had cooled a bit, I dipped one more time, hoping to attach some un-melted crystals.  I kind of like the results.  It looks like a snowflake embedded in ice. 

I really had a blast making this tag!  Can't wait to see what's up for February. 

Thanks for stopping by to check out my projects today!

Elizabeth

Supplies and Tools used for these projects include:

Distress Stain
Distress Ink
Distress Paint
Archival Ink
Tim Holtz Stamps Blue Print Snowflake and Little Labels
Remnant Rubs
Sizzix Alterations by TH Sunburst Embossing folder
Sizzix Big Kick
Digital Die Cutter
UTEE
Tonic Paper Distresser
Tiny Attacher

Stampendous Christmas Truck stamp


Monday, January 6, 2014

My Artistic Adventure Challenge # 1


Happy Day, Everyone!

Today I am sharing an easel style card that I made using a collage sheet from Heather Hudson's Etsy shop.  Heather is an incredibly talented lady!  I was excited to see recently that she is starting a series of challenges this year.  This news fit perfectly with my plan to enter more challenges.  So I am jumping right in by entering the My Artistic Adventures Challenge # 1.


I used Heather's Shabby Vintage  Chic Valentine's Day Romantic Music Tags Digital Collage sheet to make the tag that is the focal point for this easel card.  I chose to use the sepia toned version, and used all of the elements on the card.  Don't you just love the little girl and vintage typewriter photo?  I think it is adorable. 

This view shows the easel a bit better.  The card base and layers were cut with my digital cutter and a file from My Scrap Chick.  The cool thing about easel cards is that they fold flat for mailing, but are easily assembled into a display. 

I enjoyed using a pre-designed card base, so that I could focus more on the wonderful focal elements than the construction.  I used some lace from Really Reasonable Ribbon, inked the embossed layers with Distress Ink in Brushed Corduroy, and dyed the bias tape, also from RRR, with Distress Stains in Vintage Photo and Dusty Concord.  The little newsprint "Candies" are from RRR as well. 

I used an Idea-Ology custom fastener with the lovely bird element from the collage sheet:

 
I love all of the texture that Heather incorporated into this collection.  There are so many interesting layers on each little piece of art. 
 
I want to thank you for stopping by my blog today to check out my project. 
 
Be well,
 
Elizabeth
 
Supplies and Tools used in this project include:
Digital Collage Sheet from My Artistic Adventures
Lace and Ribbon from Really Reasonable Ribbon
Distress Inks and Stains
Stashed papers
Recollections metal arrow
My Scrap Chick Easel Cards SVG File
Scotch Quick Dry Glue for Paper
ATG Tape gun
Candies newsprint "buttons"
Idea-Ology Custom Fastener
foam adhesive squares
Sizzix Big Kick
Anna Griffin Embossing Folder


Friday, November 8, 2013

The one with the "old" tag...


Happy Day, Everyone!

I am gearing up to do some major Christmas crafting today.  Before I do, I thought I would pop into blog-land and post pics of a card that I mailed off to DD at college this week.

 
I found the little tag in my "card base" drawer.  (Any time I have at least a half page of scrap left over, I cut it into a 4.25 x 5 inch rectangle and store it for future use.)  I found a matching card base, and dug a couple coordinating scrap out of the scrap drawers, and voila, an almost instant card.  I love this color combo! 


I used similar colors for my stamping on the inside of the card, using Wend Vecci's new Archival color Orange Blossom and a Bo Bunny stamp for the leaves.  I used Archival Aquamarine for the sentiment.  I believe I picked this stamp out of the $1.00 bin at Michael's.  As much as I love my Distress Inks, (I used lots of them on the tag.), I am really enjoying the Archival inks for general stamping.  I like the crisp, clean images I get, and the new Wendy Vecchi collection has amazing colors.   

I wish you all a wonderful weekend!

Elizabeth

Thursday, September 26, 2013

The one with the altered index card....


Hi Everyone!

Hope your week is going well so far.  Today I am sharing my twist on the tag trend.  I love using the index cards that come in the photo storage boxes that I use for supply storage in my studio.  I often cut them into tag shapes, and always use them to soak up the splattered ink on my non-stick mat.  The other day, I decided to just use a tag as is, rather than bother with cutting it into a tag shape.  Here is the result:

 
I used the full range of metallic Distress products on this tag, as well as couple of browns.   See those pretty golden elements at the bottom right corner?  They are actually globs of overcooked clear UTEE that I poured onto my craft mat and allowed to cool.  I try not to waste anything, LOL! 
 
I love the "three guys in hats" stamp, which is part of my Tim Holtz stamp collection, as are the pen nibs that are sticking out from the flowers.  I have so much fun imagining stories for them.  I stamped them with black Archival Ink, fussy cut them, added some Distress Ink in Vintage Photo and Tea Dye and popped them with foam dots to give the piece a little bit more dimension.  I added the fun split caption banner and declared it finished. 
 
Thanks for stopping by my blog today.  Stay tuned for some fun fall and Halloween projects in the next couple of weeks. 
 
Elizabeth

Sunday, September 8, 2013

The one with my first "12 Tags" project...


Hi Everyone!

Hope your weekend has been exciting.  Today, I am posting my very first Tim Holtz 12 Tags of 2013 inspired tag.  I had fun using lots of my "Tim" products to make this tag for September. 

 
I don't have any of the new Layering Stencils yet, but I love cutting stencils with my Black Cat Cougar from That's Scap, Inc.  I layered six different stencils on this card, and added even more layers with stamps.  The text in the corners is from my newest set, Apothecary.  I have been wanting this set for a while, and am really happy to have finally added it to my collection.  The "fragile" stamp is from the "Little Labels" set, and fits perfectly on the label sticker.  I am loving my new "coffee" colored Archival ink pad. 
 
I have to say, I love having all of the colors of Distress Inks when I'm working on any project, and this was no exception.  I really want to work on adding to my Distress Stain collection as well.  I have fewer of these than I would like.  I felt lucky to be able to pull out a few light/bright colors for the base layer of this tag.  

I finished off the tag by Distress Staining some bias tape, and busting out my Type Key charms.  Yes, I have been hoarding them.  They are almost too awesome to use.  I added a little jewel and a bead, and pinned them all on using a Trinket Pin. 

I had a lot of fun with this tag, so much, in fact, that now I want to go back and catch up on all of the others.  It may be  a while before my family sees me outside of my studio! 

Have a terrific week!

Elizabeth


Tuesday, April 30, 2013

The one with the paper bag....


Hi Friends!

I made this fun birthday card for my daughter to give to her good friend recently.  I have been enchanted with paper bag albums lately, and when I needed to make a quick card, it occured to me to give the idea a test run.  So here is what I ended up with:

 
I folded a white 2 lb paper sack from the party store in half and started adding paper to dress it up.  The candle tag is from My Scrap Chick. 
 
 
The inside of the card includes a pocket on the left side for a gift card.  The pocket is made by taping down the sides of the bottom flap of the bag.  I had fun using my embossing folders to add texture. 
 
There is another pocket formed by the top opening of the bag. ( I taped down the inner sections, so that there would be just one flat pocket.)  A perfect place for a tag!

 
Here is the tag.
 
This is a very quick and easy clean and simple card to make.
 
You will definitely be seeing a paper bag album posted here in the near future! 
 
 
Have a terrific today!
 
Elizabeth


Saturday, April 13, 2013

The one with the tag....


Happy Saturday!

I started re-organizing my craft space last week, and I am still working on it.  In between storage unit construction and sorting efforts, I finished three sets of altered charms for a swap with my buddies on the That's Scrap Forum.  I will wait to post photos of the charms until everyone has received them.  But I can share photos of the tags that I made to package with them. 

I made a two layered tag to package with my charms.

 
I used Distress Inks in Crushed Olive, Tumbled Glass, Broken China, and Peacock Feathers, and Brushed Cordoroy; Distress Paints in Salty Ocean, Bundled Sage, Mustard Seed and Broken China and Picket Fence, Distress Stain in Picket Fence (to highlight the center of the hand sketched flower) and UTEE.  There are about a million different videos showing how to apply the inks and paints, so I won't bore you with the details, except to say that you really need to use a water mister liberally with the Distress Paints if you want a soft blended effect.  
 
 
Here is the completed tag:


Now I am off to my craft room to do some more organizing.  (and as usual, now that I have posted my project, I can see a couple of ways to improve it, so I will be adding a couple of beads and some more ink to the edges before getting them in the mail!)
 
 
Happy Weekend to you all!
 
Elizabeth

Tuesday, March 19, 2013

The one with Distress Paint...


Hello Everyone,

Greetings from snowy (again! still!) New England!  It is a very pretty day today.  All of the old ugly snow is being covered by a very thick blanket of lovely, fluffy, new snow!  I think that my girls are going to have a very easy time finding their Easter Eggs in a couple of weeks! 

Yesterday, I received an order of Distress Paints from Blitsy.  (Blitsy is really good at separating me from my money!)  I couldn't wait to dig in, and got started playing as soon as I got home.  (Dinner was a little late.  Sorry, family!)

This photo is of my first sample cards: 

 
I loved the color combos at the top and I had some special goodies waiting for a Springy project, so I got to work on a tag. 
 
 
The lovely metal butterfly was a birthday surprise from my forum friend Lisa (Check out her amazing work here!) I thought about painting the butterfly with the Distress Paints for an enameled look, but after consulting with my DD, who loves how it looks plain, I opted to add just a bit of Picked Raspberry to the edges.  (She was in bed when I finished.  I hope she approves!)
You can see the edges better here.
 
All of the background stamps, as well as the sentiment and butterfly fastener are from Tim Holtz. 


I cut the doily frame with my electronic cutter, and aged it by spritzing with water, crumpling it up into a ball, very carefully uncrumpling it, and adding Gathered Twig Distress Ink with a sponge applicator.  Gathered Twig is my favorite of all of the brown tones in the Distress line.  I used it in many places on this tag, including the background stamping, inked edges, on the torn edges behind the sentiment, on the paper rose, (also gifted to me by Lisa!) and on the seam tape ribbon. 
 
The yellow chevron striped ribbon is from Really Reasonable Ribbon.  It was included in a 10 yard variety pack that I ordered recently.  I will be looking for more ways to add ribbon to my projects, now that I have discovered this retailer!  ( The seam tape is also from RRR.)
 
The Distress Paints that I used for the background are Salty Ocean, Mustard Seed, Picked Raspberry, and Spun Sugar.  I learned by watching a few online demos of the Distress Paints, that spritzing with water is a good thing!  So I spritzed directly onto the paints on my craft mat, as well as spritzing the paper both before and after dragging and dabbing it into the paint on the mat, to allow the colors to blend and run.  I built up the layers using my heat gun in between applications of wet paint.  I finished the background by blending some Distress Inks in the same colors, and very lightly inking the edges, as I wanted my tag to have a fresh, Springy vibe. 
 
I also used Distress Paints to color the seam tape ribbon.  I wet the ribbon, dabbed on too much paint, (oops!) crumpled it and dried it with my heat gun.  Then I added some Gathered Twig Distress Ink to grunge it up a bit.  The project was getting a little TOO pretty!
 
Wow!  I got a little long winded in my excitement about the Distress Inks!  I will leave you with a photo of my back yard at 8:00 this morning.
 
This is not one of those cool Photoshop techniques with a bit of color added to a black and white photo.  It really is that grey in my back yard today!
 
Have a wonderful day!
 
Elizabeth